
WordPress Field Content: How to Optimize Images Before Uploading to WordPress
Resize, compress, and format images before uploading to keep your site fast, sharp, and search-engine friendly.
Photos straight from your phone or camera are often 4 to 8 megabytes. For a web page, that’s 20 to 40 times larger than necessary. Uploading oversized images is one of the most common reasons websites load slowly, and slow sites lose visitors and rank lower in Google search results.
The good news is that optimizing images before you upload them takes under a minute per image, requires no technical skill, and makes a measurable difference to your site’s performance.

Size Guidelines for Your Site
Use this as your reference before every upload:
- Full-width banner or hero image: max 1400px wide, under 250 KB
- Half-page or section image: max 800px wide, under 150 KB
- Card or thumbnail image: max 600px wide, under 100 KB
- Logo or small icon: max 400px wide, under 50 KB
Step 1: Resize the Image First
Start by reducing the pixel dimensions before compressing. Use any of these free methods:
- Mac: Open the image in Preview, go to Tools > Adjust Size, and set the width in pixels.
- Windows: Open in Paint, click Resize, and enter the width in pixels.
- Any device: Go to squoosh.app and use the built-in resize option before exporting.
For most content images on a Design Shop website, 1200px wide is a safe maximum.
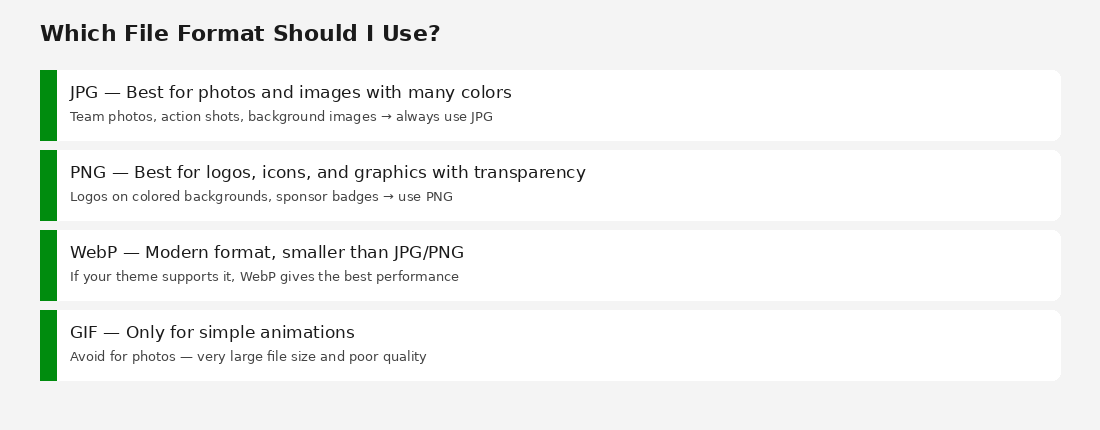
Step 2: Choose the Right File Format
File format affects both quality and file size. Use this as your guide:
- JPG — Use for all photographs, team photos, action shots, and background images. Compresses well and handles color-rich images.
- PNG — Use when you need a transparent background, such as a logo placed over a colored section. Avoid PNG for photos as it produces larger files.
- WebP — A modern format that produces smaller files than JPG or PNG at the same visual quality. Use WebP when your hosting and browser support it.
- GIF — Avoid for everything except simple animations. GIF is large and produces poor quality for photos.
Quick rule: if it’s a photo, use JPG. If it has a transparent background, use PNG.
Step 3: Compress With a Free Tool
Compressing reduces file size while keeping the image looking sharp. Use one of these free tools:
- Squoosh (squoosh.app) — Resize and compress in one step, with a live before/after preview. Recommended.
- TinyPNG (tinypng.com) — Drag and drop your JPG or PNG for instant compression. No resizing, just compression.
- Canva export — If you edited the image in Canva, export at a lower quality setting (80% is typically fine).
In Squoosh: drag your image in, resize to your target width, choose JPG or WebP as the format, drag the quality slider until the file size is under your target, then download.
Step 4: Rename Before Uploading
WordPress uses your filename to help describe the image to search engines. Before uploading, rename the file to something descriptive using lowercase letters and hyphens.
- Avoid: IMG_4823.jpg or photo1.png
- Use instead: varsity-boys-soccer-team-2025.jpg or coach-sarah-johnson.jpg
This takes five seconds and helps your images appear in Google Image Search.
Step 5: Upload to WordPress
Go to Media > Add New in your WordPress dashboard. Drag your optimized image into the upload area or click Select Files.
WordPress automatically generates multiple size variants (thumbnail, medium, large) from your uploaded image. This is why starting with a correctly sized original matters — WordPress can scale down, but it cannot restore quality that was never there.
Quick Checklist
- Image is resized to the right pixel width for where it will be used.
- File is saved as JPG (photos) or PNG (logos/transparent graphics).
- File size is under 200 KB (aim for 50 to 150 KB for most images).
- File name is descriptive, lowercase, with hyphens between words.
- No sensitive personal information is visible in the image.
What About Images Already on My Site?
If your site already has large, unoptimized images, your Design Shop team can run a bulk optimization using the Smush plugin. Ask about this in your next support session — it’s typically a quick improvement with no visible quality change.

")